Practice Notes – Simplicity

I am always looking for ways to create more continuity between my meditation practice and my asana practice. One way I do this is by trying to include both asana and seated meditation in the same session, so they flow into each other as naturally as possible. Yet, I find that I often get distracted during the active asana part – thinking about how best to sequence a set of poses for myself, or unintentionally turning my practice into a planning session for the next class I’m going to teach. So, today was all about simplicity.

I decided to simplify the asana practice by narrowing it down to two or three main poses, along with a couple of warm ups and release poses. Without pre-planning the routine, I just picked Downward Facing Dog and Warrior 2, following an instinct for what would feel good today, while sticking with basic poses that don’t require a lot of thoughtful warm up and preparation. I circled back to the main two poses several times, and made a point of noticing specific aspects of the pose or physical sensations each time. I also held them for a long time (maybe 10-12 breaths, but I wasn’t counting) to give the space for really being in the shape mindfully. The asana part was sandwiched in between walking meditation and seated meditation to emphasize the intention of continuity.

Here’s what it ended up being:

  • Walking Meditation with noting (10 mins) – I do this inside, making a “walking lane” just a little longer than my mat.
  • Half Sun Salutations, noting the movements (similar to the noting in the walking meditation)
  • Cat/Cow, noting the sensations
  • Downward Facing Dog – mostly noticing the feet and legs
  • Lunge – mostly noticing the foot’s contact with the floor and the sensation in the hip
  • Downward Facing Dog – more attention on the hands and shoulders
  • Child’s Pose
  • Downward Facing Dog – refining the alignment in the shoulders and arms, mindfully noticing the details and sensations
  • Warrior 2 – most attention in the back leg and foot, feeling how the muscles engage, direction of energy
  • Wide-Legged Forward Fold (Prasartia Padottanasana)
  • Warrior 2 – engaging the legs by isometrically drawing them in toward each other, feeling the sensation of this
  • Standing Forward Fold (Uttanasana)
  • Warrior 2 – engaging the legs by isometrically reaching them away from each other, feeling the sensation of that
  • Downward Facing Dog
  • Legs Up the Wall Pose
  • Eye of the Needle with foot on wall (hip stretch)
  • Seated Meditation (30 minutes)
  • Savasana (10 minutes)

That’s it! This worked well for me today, so I’ll be playing around more with the simplicity of looking more deeply at just a few poses. Try it and let me know if it helps you to sustain your mindfulness a little better!

Alignment Maligned: The Baby and the Bathwater

There’s been an article circulating around yogi social media circles today that’s ruffled a few (normally) well-aligned feathers: “Six Reasons You Should Stop Obsessing Over Alignment in Yoga Class” by Maya Devi Georg.  I came across it on Facebook this morning, actually through Matthew Remski’s comments on the article. It touches several nerves connected to current debates on how to make yoga safer, how we relate to our physical bodies, and what is the true significance of this practice.

The quotables from Georg’s article include:

“Obsessing on alignment keeps all the emphasis on the asana and the body. It also emphasizes a level of detail that will neither prevent injury nor make the pose more visually appealing.”

And somehow also this: “When a teacher over-talks, giving far too many details about the alignment of a pose, it takes the student out of their body and into their mind.”  (Wait, where are we stuck? Body or mind?)

And, my favorite: “If you must wait to master one pose before you can begin working on another, you will wait, sometimes for years, while your body loses flexibility and strength. Besides, how long do you want to work on tadasana?”  (Tadasana is Mountain Pose, for those who’ve forgotten your Sanskrit.)

Clearly, the article was meant to be a bit provocative (it includes a little profanity and a lot of attitude), and I admit my first reaction to it was a bit snarky. Here’s my comment on Matthew Remski’s Facebook thread: “I don’t get the sense that she’d be interested in this (see comment “How long do you want to work on Tadasana…”), but if she wants to forget about alignment and just meditate, it sounds like she should just sit down on a zafu and get to it!”

Ok, maybe that was a little harsh, because I don’t know her, and maybe she is serious about meditation. But since the article brought up Patanjali, I think it’s fair to guess that the asanas he had in the back of his mind when writing “the pose should be steady and easeful” looked more like this:

meditatingmodel-on-red-cushion1

than this:

crazy_yogapose

That’s an educated guess, because Patanjali actually did not describe any physical postures in the Yoga Sutras (c. 150 CE), and the related commentary text Yoga-Bhashya, written by Vyasa in the 5th Century, details 11 asanas, all of which seem to be seated meditation postures.

Putting that aside, I actually agree with some of Georg’s points, but not the conclusions she draws from them. Even though it is challenging to teach alignment in a well-integrated way, that does not mean we should throw the baby out with the bathwater.

It really IS challenging to teach alignment without being overly technical and cerebral, inadvertently encouraging students to remain stuck “in their heads.”  But this doesn’t mean alignment instruction has to be a distraction. Ideally, there is a huge sensory aspect to learning alignment. Students shouldn’t be looking around saying “Am I doing this right?” but rather feeling into the pose to discover how any particular alignment principle applies to them.

And, there definitely ARE lots of anatomical variations – ranging from actual skeletal differences that no amount of yoga will change, to injuries or muscular imbalances that may prevent the full realization of a particular alignment principle on any given day. But that’s OK, because alignment is not really supposed to be about aesthetics. Yoga teachers are not sculptors!  And alignment is not about making each person meet some universal standard – in order to truly be safe, it must make allowances for students’ actual bodies and meet them where they are.

In my experience, students (myself included) do not always know when they are misaligned in a pose. It may or may not feel “off.” Sometimes we don’t understand right away what a pose is about, what parts of the body it is targeting, and what alignment would mean in that pose unless someone teaches us how to envision and FEEL it.  And, when all the body weight is dumping into the arms in Downward Facing Dog, and a teacher helps you with that, it is an act of compassion. When a teacher makes you work on Dolphin Pose for a long, long time before teaching you Headstand, that is also compassion.  And smart. And safer for your neck, which is no small thing.

Alright…this rant is almost finished, but here are a few of my thoughts about alignment, which I hope will be the quotables from this article:

Alignment in yoga is key to safety, but it has power beyond that. Taught well, it can awaken unconscious, dormant, underused parts of the body (and mind).

Proper alignment can sometimes feel foreign, even uncomfortable, at first. “Familiar” is not the same as “aligned” because yoga is supposed to expose our habits.  This is one way in which yoga is more about undoing than doing.

Focusing in on a subtle point of alignment can be an excellent way to develop concentration, rather than a distraction. Alignment should help to bring the body and mind together, or in other words, heal the “body/mind split” most of us are living with.

I respect that there are other approaches and perspectives, and especially Georg’s intention to make the asana practice more of a meditation.

But, how long do I want to work on Tadasana?  For the rest of my life! It will be useful as long as standing upright is part of my daily repertoire…and standing still is actually a great way to meditate.

Continuity of Meditation & Asana on Retreat

I’ve been back from my retreat at Spirit Rock for a week now, and I’m finally finding some time to share my experiences. One of my main interests in blogging is to talk about the continuum between mindful movement (yoga) and mindful stillness (seated meditation) in my practice. I don’t always find it easy to identify that continuum, but I want to make it stronger so that my yoga and meditation practices can support each other better.

spiritrock_bell

The bell at Spirit Rock that calls retreatants to sitting sessions.

Not surprisingly, this is all a lot easier on retreat! While it was mostly a meditation retreat, alternating between 45 minutes of sitting meditation and 45 minutes of walking meditation for most of the day, we also had the opportunity to attend yoga classes at least once a day.

These yoga classes were an absolute life saver.  Whoa. Let me tell you…when you do that much sitting day after day, the yoga is huge in relieving the tensions, aches, and pains that accumulate in the body. My achiness peaked on the third day, but after that, I actually felt MORE open and comfortable in sitting.

I also found the yoga supported my sitting practice in a second major way: it built up my energy. I have the tendency when I start to get calm and concentrated, to go too far in that direction, and I fall asleep. This didn’t happen when I first started meditating, because I had all that restless agitation to keep me awake! I have been working on balancing the energy level in sitting, so that I can be calm and concentrated, but also vibrant and alert. Each time I took a yoga class on the retreat, I felt energized for the next sitting session. Much like the disappearance of my achiness, over the course of the retreat, I found I was struggling less with sleepiness.

One of the Buddhas at Spirit Rock

One of the Buddhas at Spirit Rock

The yoga practice itself felt more mindful – like a logical extension of the sitting and walking we’d been doing. I think there are a several reasons for this:

  • Continuity is supported by the retreat itself – not just concerning the yoga, but through all activities (eating, walking from one place to another, taking a shower). Everything is part of the practice.
  • Being surrounded by dozens of other students doing the same practice you are, with the same (or at least similar) intentions. This feels different from going to a public yoga class where people are gathering from all kinds of different places, each bringing in their own busy energy, and each with their own goals for the practice, ranging from the sublime to the superficial.
  • The silence of the retreat helps you to get out of your head. When you’re a yoga teacher and you attend another teacher’s class, it’s hard not to go into an analytical space as you experience their style, cues you like/dislike, etc. In a silent retreat, the students don’t speak, but the teacher does – but her words were chosen carefully, and she wasn’t just speaking to fill the space. And, probably it goes without saying, but these yoga classes were done without music. No distractions.
  • The presence of the teacher herself. The yoga teacher participated in most of the seated meditation with us, came to the nightly talks, and was really integrated into the retreat. She was operating at the same speed as us.
  • The yoga was simple.  No elaborate or super challenging poses, and the poses were given without an abundance of technical alignment cues. Normally, I teach a very alignment-based form of Hatha Yoga, but it’s always a fine line to teach with precision without making the practice too cerebral. The simplicity of this practice on retreat allowed us to just stay present with the body.
  • And, the yoga was just what we needed. The focus of the yoga was on reinforcing the themes of the retreat, and preparing the body for sitting. We were opening the hips, releasing the shoulders, and turning towards the body with kindness, rather than emphasizing fitness, technique, or the attainment of particular poses. Not that these goals are always a problem, but they can actually compete with the intention to make the asana a meditative experience.
  • The asana practice didn’t overuse one’s physical energy to the point where you collapse into savasana at the end. When I go to a more vigorous class, sometimes I leave feeling drained rather than relaxed. That’s a sign of overusing energy. I know some students are so wound up, they feel like exhaustion is the only way to actually relax in savasana at the end. But, ideally, yoga balances the energy rather than draining it. True relaxation is not the same as exhaustion or dullness.

Yin Yoga for Runners

Well, I’ve been back from my meditation retreat for a few days, and I’m still re-learning how to do this “every day life” thing.  It was a wonderful experience, and it’s still with me.  I’ll write a reflection or two about the retreat soon.

In the meantime, my friend and fellow yoga teacher, Erika Hall, recently asked me to write something for her newsletter about how Yin Yoga can benefit runners.  She specializes in yoga for these athletic types, so I put together five of my favorite yin poses for runners to try.  Here it is!

Erika: Boy have I been loving Yin Yoga lately. With the intensity of my daily training, Yin Yoga offers a perfect gentle balance while increasing my flexibility and stretching my tight muscles.  I know  A LOT about yoga, but even the teacher needs to take a class. When I do, I seek out Addie deHilster of TheraYoga. It is my pleasure to introduce you to my first guest contributor ever, Addie deHilster, my go-to Yin Yoga Guru. Addie happily agreed to compile her list of Top 5 Yin Yoga Poses for Runners and share it with us.  I’ll let Addie tell you more about it…

Addie: Runners are used to moving fast, so it may be a little counter-intuitive that you can benefit so much from a decidedly slow practice like Yin Yoga.  It might sound like a paradox, but spending a little extra time relaxing in a few Yin poses can often increase your flexibility more quickly than doing lots of active poses.

Yin Yoga is a soft and mellow approach to yoga.  In this practice, we hold most poses for 3-5 minutes at a time, gradually and thoroughly stretching the body.  Science has shown that it takes at least 90 seconds to begin to stretch the connective tissue, known as fascia, that surrounds our muscles.  If you have tight fascia surrounding your muscles, you’ll be limited in how much you can improve your flexibility.

The following are five of my favorite Yin Yoga poses for runners.  I recommend practicing Yin postures on your off days from running, or after a run for some wonderful recovery time.  Slow down for a while and enjoy these, and your muscles and fascia will thank you!

cattail3, cropped1) Cat Tail Pose: This is a great stretch for the quadriceps and hip flexors. Lie on your right side and rest your head on your arm, or a blanket place on top of your arm. Take your top leg and extend it out placing the foot on the floor in front of you to stabilize the body. Then, bend your bottom knee and reach back to hold the foot in your hand.  Gently pull your heel toward your seat with a steady, but relaxed, pressure.  Stay here for 3 minutes.

cattail4, croppedBefore going on to the second side, you can take this into a delicious twist.  Loosen your grip on the bottom foot, then roll your top shoulder back toward the floor.  Let the body shift back and settle into the twist for another 2-3 minutes.  Repeat on the other side.

banana12.) Bananasana: This pose stretches out the entire side of the body, including the infamous IT Band!  Lying on your back, walk your straight legs together over to the right. Keep the pelvis level. Then use your elbows to walk your torso over to the right, forming a C-shape “banana” curve. You can take the arms overhead and clasp opposite elbows, or just place one hand on the belly, one hand on the chest. Rest here and breathe into the gradual stretch for 3-4 minutes, then change sides.

rack1
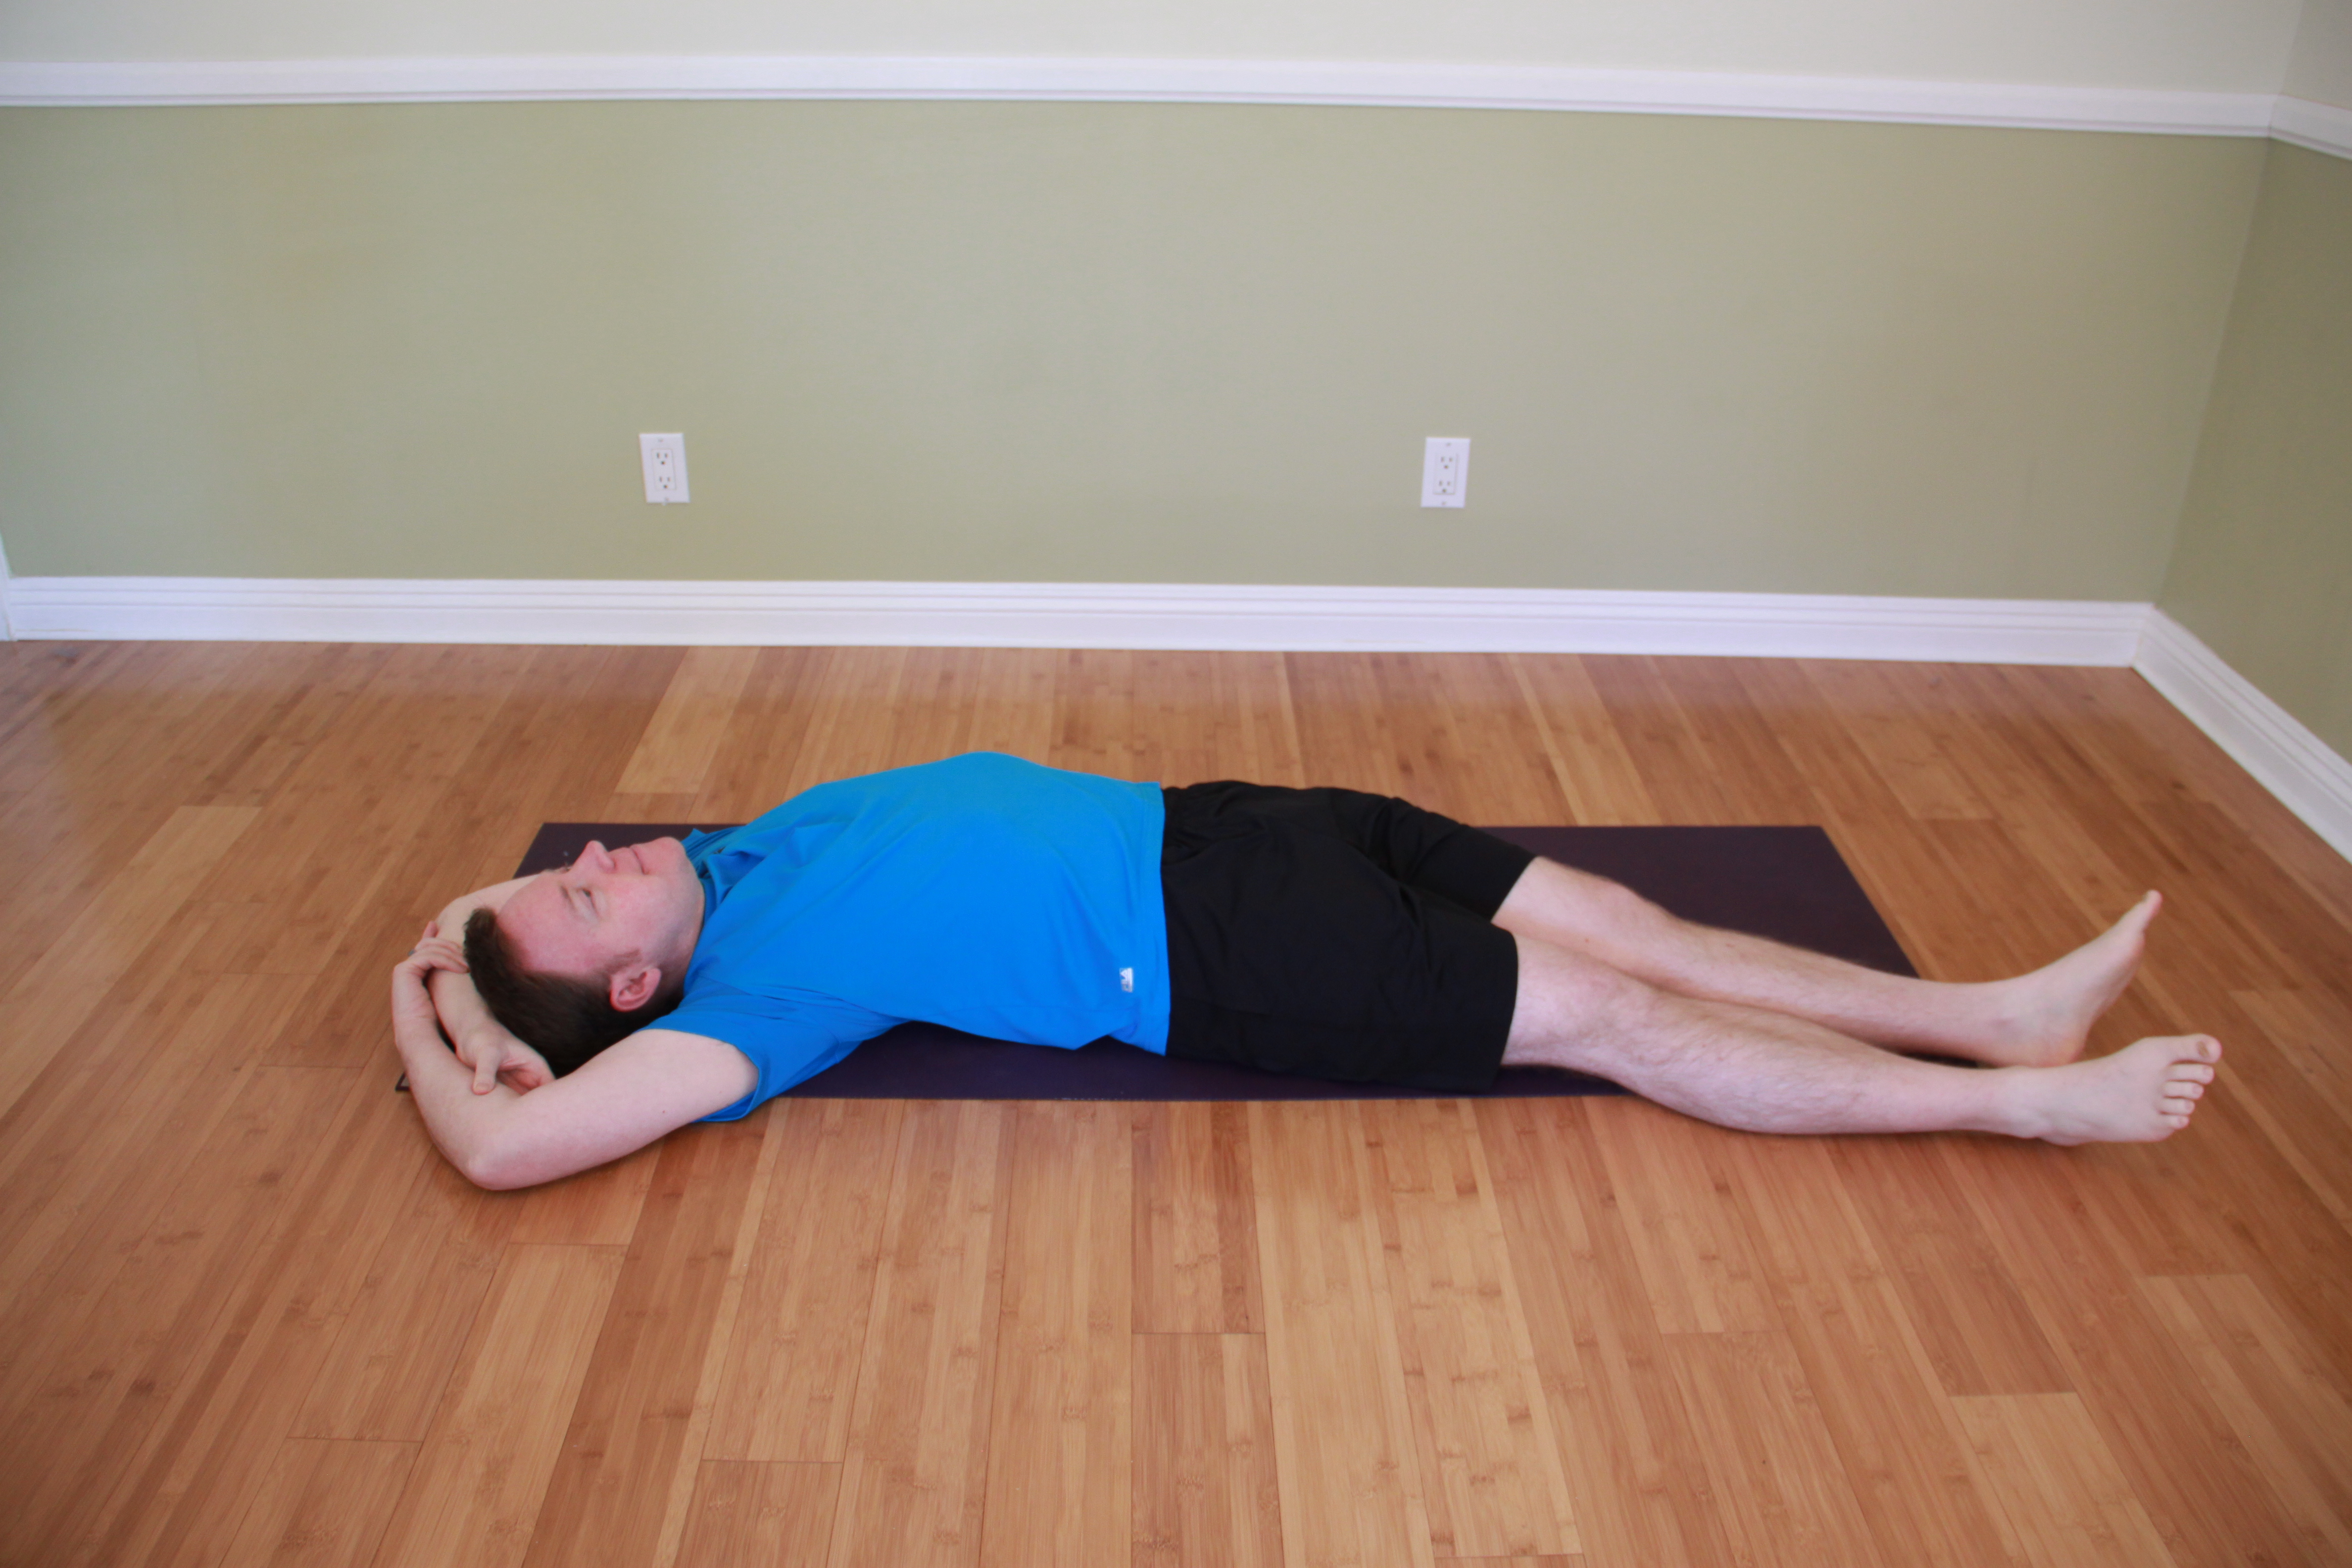
3. Hammock Pose (aka “The Rack”): The biceps are an overlooked tight spot for most runners – while you’re running, you’re holding the biceps in a flexed position for an extended amount of time!  To practice the Hammock, start sitting with your knees bend and feet on the ground, taking your hands behind you and pointing your fingers toward your seat.  Lift your hips as if going up into a tabletop position, then shift your hips forward toward your heels and sit back down again.  Keep the elbows bent and pointing behind you.  Breathe calmly here for up to 2 minutes.

eyeofneedle44) Eye of the Needle Pose: This is an excellent stretch for the outer hip, especially the Piriformis.  Another fun variation of this pose is to practice it with the foot on the wall, rather than held by your hands.  To come into Eye of the Needle, lie on your back with your knees bent and feet on the floor.  Turn your right leg out as you bring it towards your chest, crossing the right ankle over the left thigh.  Bring both legs in towards the torso, and reach your right hand between the “window” of the legs.  Hold onto the back of the thigh, still keeping your shoulders, neck, and head relaxed.  Be here for 3-4 minutes on each side.

suptapad15) Supta Padangusthasana with Strap: This pose will give you a nice release along the entire back of the leg, from calves to hamstrings.  Loop up a long yoga strap and place it around your torso at the upper ribs, right under the arms.  Bend your right knee to slip your foot into the strap, then straighten your leg.  The leg may be at less than 90 degrees to the torso, which is fine.  Having the strap around your torso creates a “hands free” version of this pose, which is more relaxing for your upper body.  Take 3 minutes with the leg in this position, then you can keep your foot in the strap and tilt the leg out to the right.  Let the strap help hold your leg in place, stretching the inside of the leg for about 2 minutes.  Lastly, bring the leg back up through the center and across the body a few inches until you feel a stretch along the outer leg, hip, and IT Band.  Spend another 2 minutes here.  Then change sides.

You will need a 10-foot yoga strap for practicing this pose with the strap around your torso, but just in case you only have shorter straps around (or say, the belt of your bathrobe), you can simply loop the strap onto your foot and hold it in your hands.  The great thing about stretching your legs from a reclining position is that it helps recirculate blood and fluids from your feet and lower legs.

Bonus – Legs Up the Wall Pose: If you have time and wall space, resting with your legs up the wall is fantastic for refreshing those tired feet!  Five minutes here will help you recover from miles of pounding the pavement.

And then, Erika kindly mentioned my upcoming Yin-related events (in case you’re in the LA area!):

  • Weekly Yin Yoga class – 6pm Friday evenings, TheraYoga (Montrose, CA)
  • Yin Yoga Workshop: “Slow is the New Fast” – Sunday, Feb 9, 2:00-4:30, TheraYoga.  Learn how slowing down your practice can give you a more thorough stretch and improve your flexibility faster!  More info.
  • Yin Yoga Weekend Immersion & Teacher Training – March 14-16 at TheraYoga.  Open to current and aspiring yoga teachers, as well as enthusiastic students who wish to spend the weekend immersed in all things Yin!  More info.

Here’s the link to the original article on Erika’s site.  Enjoy!

Differences Between Yin & Restorative Yoga

When I first discovered Yin Yoga several years ago, I was drawn to it because it seemed to provide a bridge between my yoga practice and my meditation practice like nothing else had before.  Since I’ve been immersed in Yin (and have trained in Restorative, too), I’ve noticed that people often wonder – what’s the difference between Yin and Restorative?

addie upavistha photoshoot, squareOn the surface, they look similar.  Both are very mellow yoga practices done primarily on the floor, using plenty of props and holding the poses for minutes at a time.  Both styles can have incredible stress-relieving benefits, and the repertoire of poses even overlaps somewhat.  But, they are not the same!

In my observation, one of the main distinctions is that in Restorative, one is encouraged to rest both physically and mentally. In Yin, the poses are approached more like meditation postures, keeping the mind more alert and present, avoiding zoning out, so we can cultivate mindfulness. This is absolutely not meant as a criticism of Restorative.  I love both, and think there’s a time for rest and a time for meditation.  But, this aspect of mindfulness in Yin Yoga (especially as taught by Sarah Powers) is the main reason I first fell in love with it.

Along with the mental alertness, Yin Yoga also embraces a bit more sensation in the poses, stretching to a sustainable edge.  In Restorative, the objective is not so much to stretch, but to gently open the body and breath while balancing the nervous system.  I’ve heard people say that the difference is that Restorative uses props (like bolsters, blankets, blocks, etc.) and that Yin doesn’t.  I passionately disagree with that!  (I explain more about props here.)

Back to the topic at hand, Yin Yoga also works with the energy body in some specific ways that are different from Restorative Yoga. “Yin” and “Yang” are Taoist terms, alluding to the fact that Yin Yoga draws upon wisdom from Traditional Chinese Medicine, using the stretches to stimulate the movement of Chi along the body’s energy meridians.

Lastly, the repertoire of Yin Yoga poses mostly favors the legs, hips, lower body, and spine (though not exclusively). Restorative Yoga, on the other hand, is full of delicious supported backbends.  But, this is also where I tend to mix the two styles together in my teaching and practice.  Those bolster backbends are a great way of including the upper body meridians in the Yin practice, and I believe that if you practice them with the same vibrant attentiveness as any other Yin pose, then they fit seamlessly within your Yin practice.

Namaste!